Creating a Targeted Student List in Navigate
You can use Navigate to create targeted student lists for various purposes, such as identifying students who meet specific scholarship requirements and sending them communications about available opportunities.
Other reasons to create a targeted list may include:
- Classifying students by year (e.g., Freshman, Sophomore, Junior, Senior, Graduate).
- Targeting new students (e.g., Fall 2024 enrollees).
- Focusing on specific categories such as first-generation students, athletes, or other unique attributes.
Once you've created a targeted list, you can use it to communicate with these students directly by sending emails and/or text messages through Navigate. This allows for a streamlined approach to reaching the right audience with tailored messages.
- Login to Navigate
- Url: wcupa.campus.eab.com
- Enter your university credentials to log in
- Access Reports
- From the left-hand menu, click the Reporting icon
 .
. - Select Standard Report Tab
- Scroll down and select Students Report.
Worksheet: Define Your Search Criteria Example Search
Search Parameters:
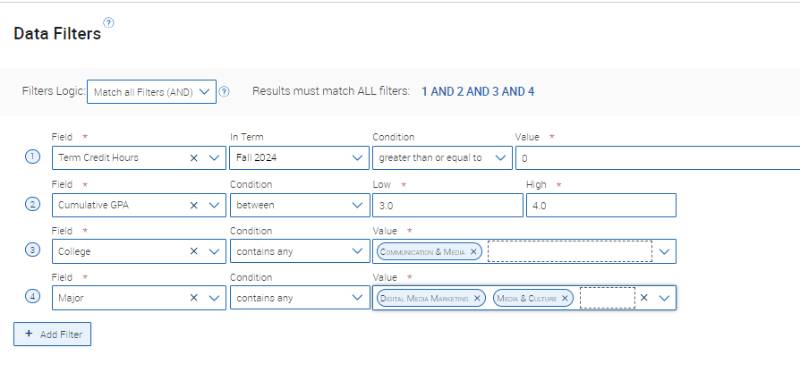
- Categories: First-Generation, Athlete
- CUM GPA: 3.0 to 4.0
- College: Communication & Media
- Major: Digital Media Marketing, Media and Culture
- List Name: "Fall 2024 Digital Media and Culture Majors GPA 3.0-4.0"
- Click on Field 1, Scroll down, and select Categories under the Student Information
section.
- Click on the Value Field.
- Scroll through the list. Category examples include Athlete, First-Generation, Academic Standing, Commuter, College of….
- Select Athlete and First-Gen: (will limit your student list to students who are Athlete and First Gen)
- Athlete
- First Gen
- Categories represent student attributes
- In Field 2 scroll to Term Credit Hours – under Student Performance Data
- The term will default to the current term.
- Change the Condition field from Exactly to Greater than or equal to by clicking on the carrot, next to exactly.
- Type 0 in the Value Field
- In Field 3 scroll down to Student Performance Data (Cumulative GPA)
- Example: CUM GPA between 3.0 and 4.0
- Your selected GPA range: type the GPA number in the low and high fields
- Minimum (Low) 3.0
- Maximum (High) 4.0
- Change Condition from Exactly to Between, if you are looking for a range of GPA parameters, otherwise you could use the Less than, or greater than options.
- Student Area of Study (College/School = Department) and Major)
- Example: Accounting, Art & Design, Communication & Median, Psychology…
- Your selected College/School:
- Value: Communication & Media
- Which major(s) do you want to include?
- Example: Digital Media Marketing, Media and Culture, Certificate
- Your selected majors:
- Digital Media Marketing
- Media and Culture
- Which department do you want to focus on?
- Add another filter for Majors

- Adding Additional Filters:
If you want to limit the report to certain classifications of students, you can add another filter - Scroll to Student Term Data, click on Classification
- Click on the Value Field
- Check off the student level(s) you want on your report.
- Run Report
- Once all criteria are entered, click Run Report at the bottom of the screen.
- Review Results
- Ensure the list aligns with your expectations. If needed, adjust filters to refine the list.
Optional Steps:
- Save the List
- If this is a list you may need again, click "Save As", located at the top right of your screen.
- Name the Student List – always start with the term then include other parameters you used on your search (e.g., "Fall 2024 Digital Media and Culture Majors GPA 3.0-4.0").
- The saved report will now appear in your My Saved Report tab.
- You can access this list anytime, and the information will automatically update.
- Export the List


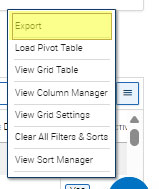
- Click the "hamburger button" at the end of the report (right side) and scroll to Export.
- Choose the file type for your export
- Schedule the Report
If this is a report that you need to access daily, weekly, or monthly you have the option of scheduling the report. When you configure a Schedule for the report the report will be mailed to your WCU inbox mirroring your date set-up. - Go to your My Saved Report Tab
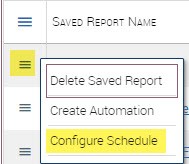
- Find your report and click on the three horizontal lines (hamburger) before the name. A list of options will appear, choose Configure Schedule.

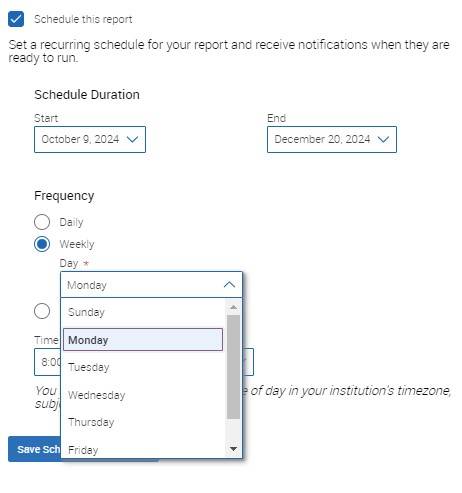
A new window will open-Saved Report Settings.
Set your:
- Schedule Duration
- Frequency
- Time of Day for delivery
- Save Scheduled Report Rule

Congratulations! You have created a targeted student list, saved it for future reference, and scheduled the report to be delivered to your WCU Outlook Inbox.
