Creating an Appointment Summary
What: Appointment Summaries let you document information about specific student appointments.
Where: Appointment Summaries are primarily created and stored in three main sections of the platform: Staff Home, a Student Profile page, and the Standard Report page.
Who: Appointment Summary Reports provide staff and faculty with the ability to record interactions with students pertaining to a specific appointment.
Conditions: The ability to create, edit, and view Appointment Summary Reports is permission-based by user role. Care Unit permissions also limit access to a student’s summary reports.
Feature Overview
- Appointment Summaries let you document information about a specific student appointment, whether the appointment was scheduled, a drop-in or the student was a no-show. Access to Appointment Summaries can be limited to your specific Care Unit and is based on your user role permissions. Contact your Application Administrator if you have questions about your permissions and viewing summary reports.
- In addition, you can add an Appointment Summary on behalf of another user by going to the Appointment tab of their profile, selecting the appointment, and choosing Add Summary from the Actions menu.
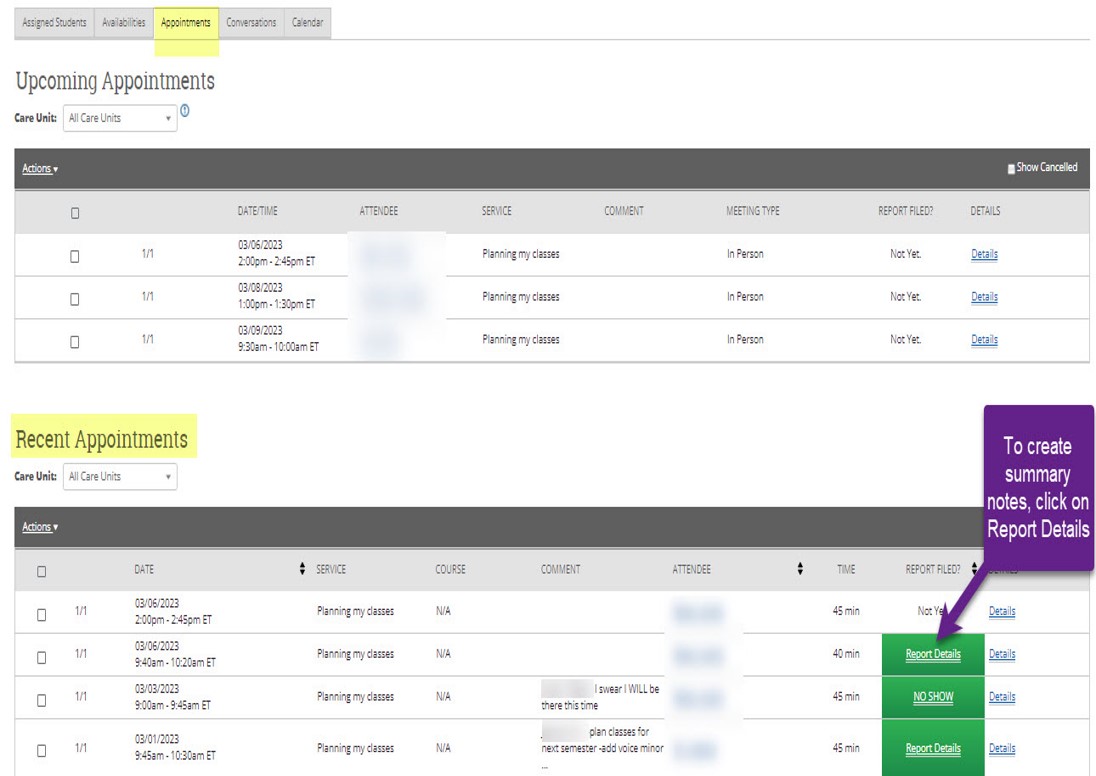
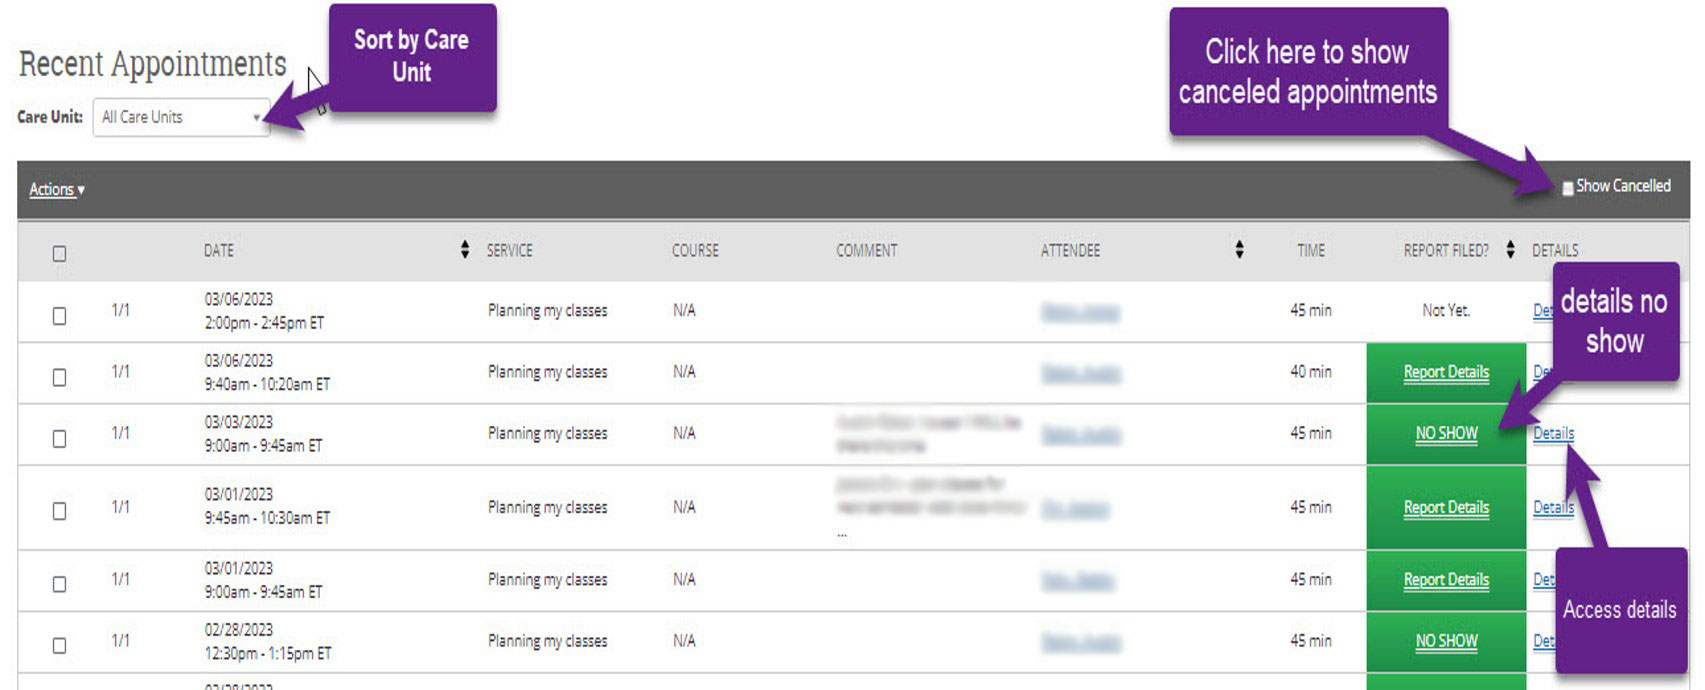
Recent Appointments
- To access your student appointment information.
- Login to Navigate and in the Staff Homepage, click on the Appointment Tab
- Here you will see a list of appointments made in Navigate
- Upcoming
- Recent
- To create a report summary, click scroll to the Recent Appointment section and by clicking on Report Details
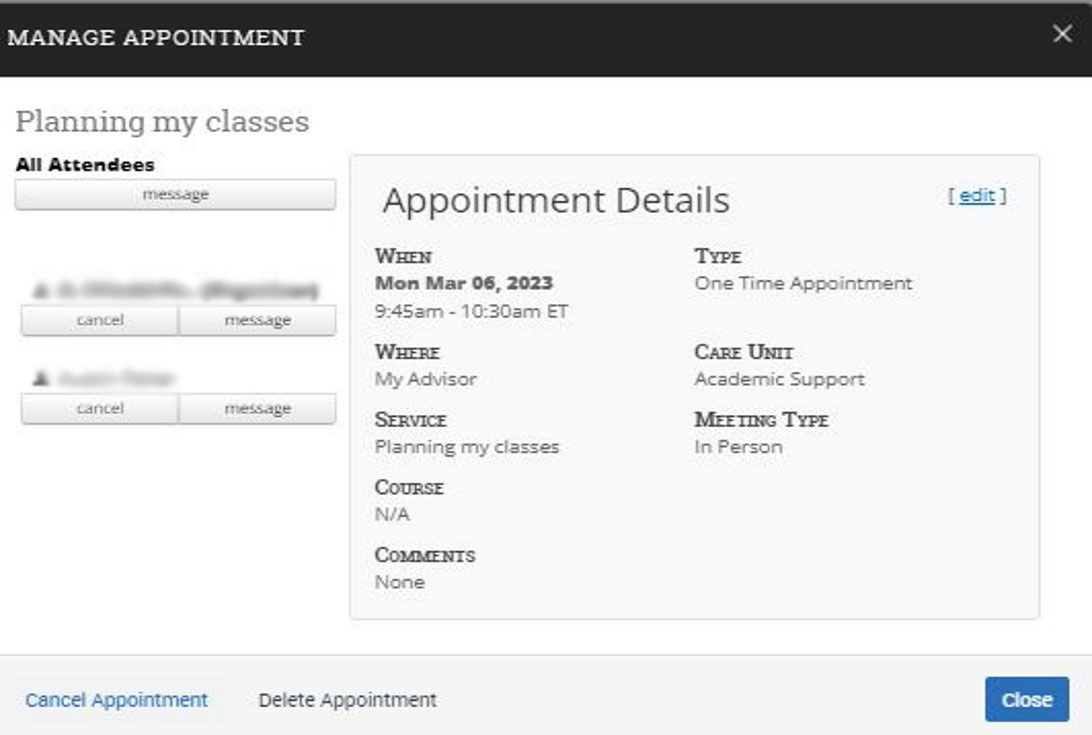
Details of Appointments
Report Details
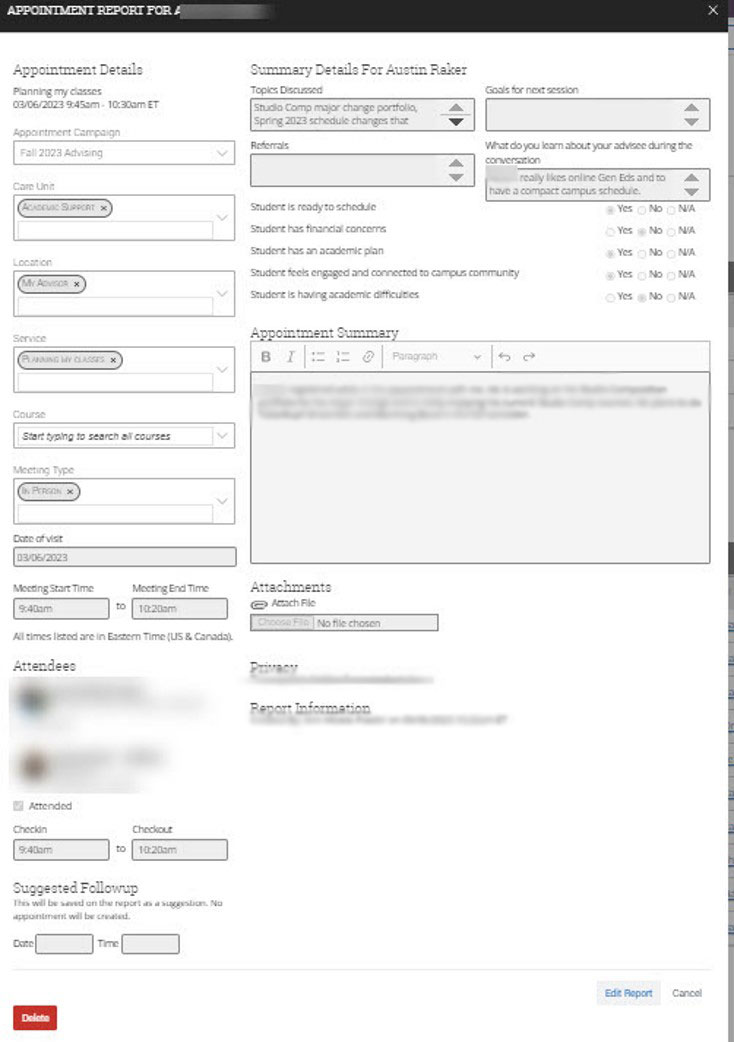
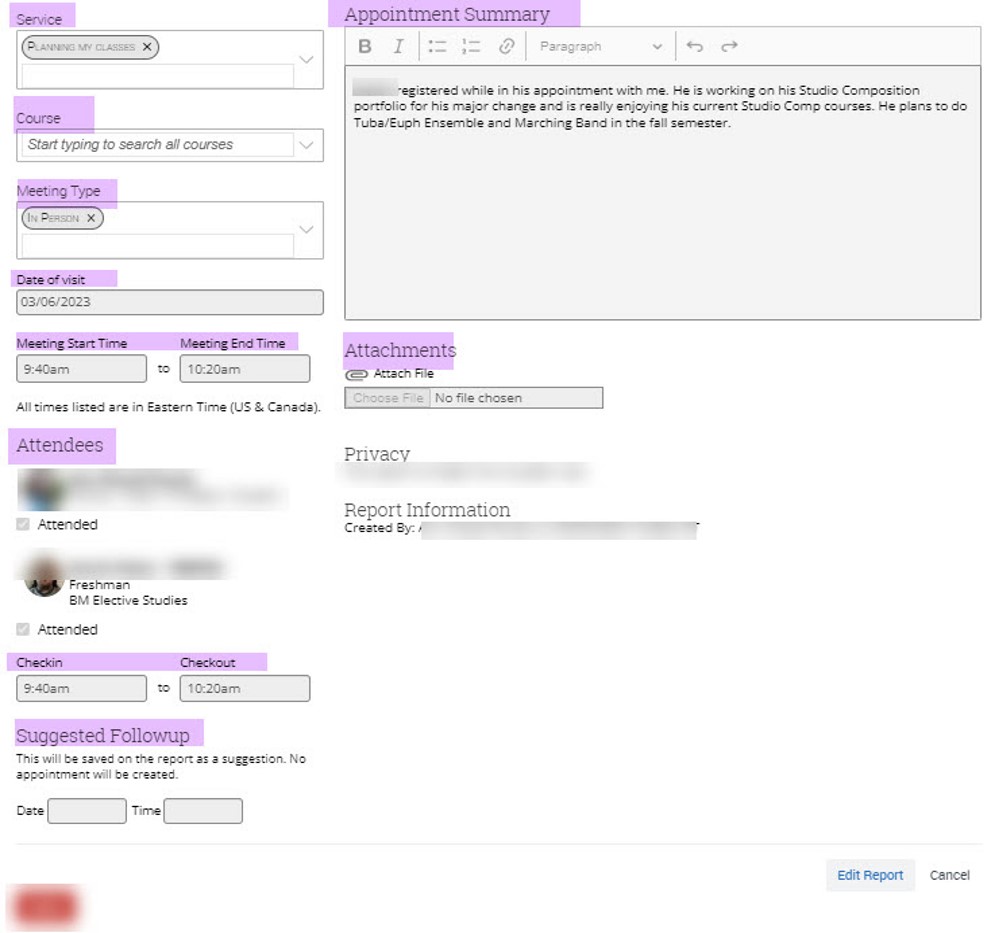
- There are several fields to complete when adding report details.
- Many of the fields are auto-completed from the information the student entered when making their appointment,
- Summary for Details to be completed by the Advisor/Staff/Faculty member
-
- Appointment Summary – this summary will be viewable to students.
- Check-in and Checkout
- Supported Follow up
- Submit when completed.
Appointment Summary Glossary and Definitions
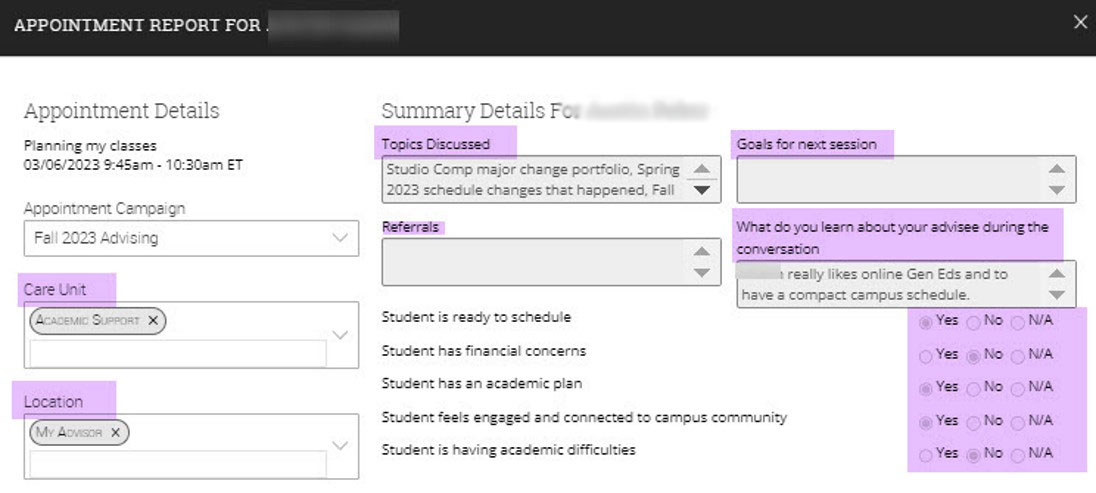
Appointment Summary Reports should only include information related to that specific appointment. Within an Appointment Summary Report, you can include the following information:
- Appointment: Gives the date, time, and scheduled service for the appointment.
- Appointment Campaign: If the appointment was scheduled through an Appointment Campaign, then the name of the campaign is selected. If the Location and Service of the appointment correspond with an Appointment Campaign you are involved with, you may be able to associate this appointment with the campaign by selecting it from this dropdown. This is only true when you are creating an Appointment Summary for one student. For more information about Appointment Campaigns, see this article about Appointment Campaigns.
- Care Unit: Indicates the Care Unit associated with the appointment. This field is locked if the appointment was scheduled in advance.
- Location: The location where the appointment occurred. This field is locked if the appointment was scheduled through an appointment campaign.
- Service: Indicates the student service associated with the appointment. Only services associated with the selected location will display as options in this field.
- Course: You can associate the appointment with one specific course. The student’s currently
enrolled courses are displayed when selecting options from the field. However, you
may search for any course regardless of the student’s enrollment.
- Note. The course should populate on the report automatically if the appointment was scheduled for a course or the student dropped in for a specific course.
- Meeting Type: Indicates if the meeting was on the phone, in-person, or virtual. These options are configured by your institution.
- Date of Visit: The date the appointment occurred.
- Meeting Start/Meeting End: For appointments scheduled in advance, the Meeting Start and End times default to the scheduled start and end times for the appointment. For drop-in appointments, the Meeting Start time defaults to the time the summary report is created, and the End time defaults to the time the summary report is saved. You can edit the fields as needed.
- Check-in/Checkout: These fields default to the times when the student checked in and checked out via Kiosk or Appointment Center. In cases where the student did not check in or check out for the appointment, the fields remain blank. In cases where the student checked in but did not check out, the check-out time defaults to the time the summary report is saved. Note that check-in/check-out times which are manually added to the summary report will not display in the appointments report, appointment summary report, and check-ins report.
- Attendees: The checkbox indicates attendance for each appointment attendee. Not checking the box indicates a no-show.
- Summary Details: These fields and questions are optional and can be completed at your discretion. These options are configured by your institution.
- Summary: Students can see these notes. Use this field to summarize your interaction with the student.
- Attachments: This allows you to attach a file to the summary report, such as a plan or tutoring schedule. Navigate does not allow attachments with certain special characters in the title.
- Suggested Follow-up: These fields are used for informational purposes only. No appointment will be created
as a result of filling them out.
- If you have permission to edit summary reports, you see Edit at the bottom right of the report dialog.
Completed Summary