

How to Add Yourself to a Class's Waitlist
When a class you are attempting to schedule is full, meaning the enrollment capacity has been met, you may enroll yourself onto the waitlist. As enrollment fluctuates, a process in myWCU will attempt to enroll students on waitlists into those classes as seats become available. These instructions will detail how to search for and enroll onto waitlists. If you are already enrolled in a different section of the class you are trying to waitlist or have another class on your schedule for the same time as the class you wish to waitlist, be sure to enroll onto the waitlist using the swap option.
Tile navigation: Student Homepage > Classes > Add Classes
- From the Student Homepage, click on the Classes tile.
- From the menu on the left, click on Add Classes.

- Enter the term where you want to add classes, and search for the class using the Class
Search function. When searching for the class, be sure to uncheck the Show Open Classes
Only box. This will include classes that are closed and in waitlist in your search
results.

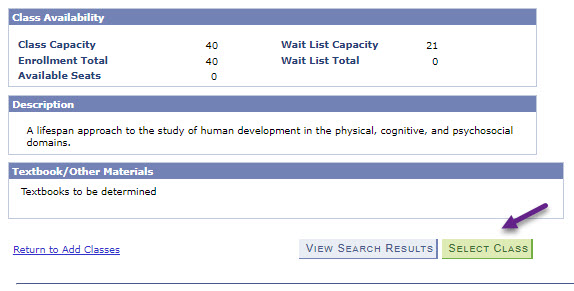
- Click the green select button on the class that you would like to waitlist. The status
of the class will have a yellow triangle denoting the waitlist status.

- The details of the class will be displayed and you will click on the green Select
Class button.
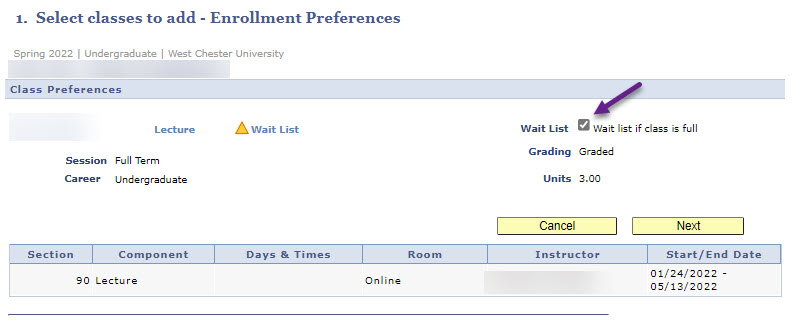
- Make sure the Wait list if class is full box is checked.
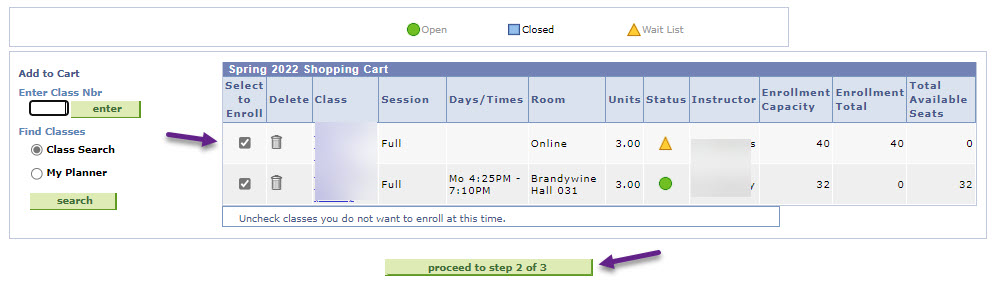
- Before proceeding to step 2, make sure the class that you want to waitlist is checked
and click on the green proceed to step 2 of 3 button.
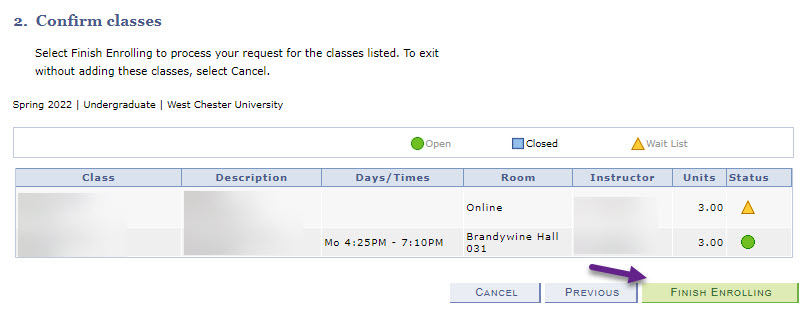
- Click on the green Finish Enrolling button, if all looks correct, or click on the
Previous button to go back and make changes.
-
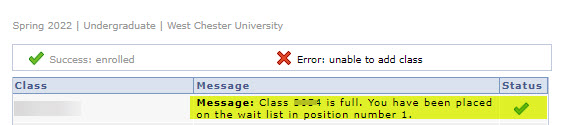
The confirmation will be displayed with a green check next to the class which
indicates you were successful in enrolling on to this class’s waitlist.
- Review the message to see your position on the waitlist; this is the order in which the system will try to enroll you onto the waitlist when a seat becomes available in the class.
- View your waitlisted course on your class schedule using the Class Schedule Filter
Options. With the Show Waitlisted Classes box checked, you will see your waitlisted
class listed. Click the green filter button to show schedule with filter option.

Additional Notes
- Students may only waitlist up to 7 credits at a time.
- Students will receive an automatic notification when:
- They are successfully moved from the waitlist and enrolled in the course.
- The waitlist process attempts to enroll the student, but is unable to because:
- There is a time conflict with another course on the student’s schedule.
- The student would exceed the maximum allowable credits for the term.
- The student is enrolled in another section of a same course.
- If the system is unable to enroll the student in position #1 into the class, it will attempt to enroll the student in the next positions until a student is successfully enrolled.
Content Manager: Academic and Enterprise Systems